You can have data without information, but you cannot have information without data. ~Daniel Keys Moran
Here we resume our discussion of
DFIR Redefined: Deeper Functionality for Investigators with R as begun in
Part 1.
First, now that my presentation season has wrapped up, I've posted the related
material on the
Github for this content. I've specifically posted the most recent version as presented at
SecureWorld Seattle, which included
Eric Kapfhammer's contributions and a bit of his forward thinking for next steps in this approach.
When we left off last month I parted company with you in the middle of an explanation of analysis of emotional valence, or the "the intrinsic attractiveness (positive valence) or averseness (negative valence) of an event, object, or situation", using R and the Twitter API. It's probably worth your time to go back and refresh with the end of
Part 1. Our last discussion point was specific to the popularity of negative tweets versus positive tweets with a cluster of emotionally neutral retweets, two positive retweets, and a load of negative retweets. This type of analysis can quickly give us better understanding of an attacker collective's sentiment, particularly where the collective is vocal via social media. Teeing off the popularity of negative versus positive sentiment, we can assess the actual words fueling such sentiment analysis. It doesn't take us much R code to achieve our goal using the
apply family of functions. The likes of
apply,
lapply, and
sapply allow you to manipulate slices of data from matrices, arrays, lists and data frames in a repetitive way without having to use loops. We use code here directly from Michael Levy, Social Scientist, and his
Playing with Twitter Data post.
polWordTables =
sapply(pol, function(p) {
words = c(positiveWords = paste(p[[1]]$pos.words[[1]], collapse = ' '),
negativeWords = paste(p[[1]]$neg.words[[1]], collapse = ' '))
gsub('-', '', words) # Get rid of nothing found's "-"
}) %>%
apply(1, paste, collapse = ' ') %>%
stripWhitespace() %>%
strsplit(' ') %>%
sapply(table)
par(mfrow = c(1, 2))
invisible(
lapply(1:2, function(i) {
dotchart(sort(polWordTables[[i]]), cex = .5)
mtext(names(polWordTables)[i])
}))
The result is a tidy visual representation of exactly what we learned at the end of Part 1, results as noted in
Figure 1.
 |
| Figure 1: Positive vs negative words |
Content including words such as killed, dangerous, infected, and attacks are definitely more interesting to readers than words such as good and clean. Sentiment like this could definitely be used to assess potential attacker outcomes and behaviors just prior, or in the midst of an attack, particularly in DDoS scenarios. Couple sentiment analysis with the ability to visualize networks of retweets and mentions, and you could zoom in on potential leaders or organizers. The larger the network node, the more retweets, as seen in
Figure 2.
 |
| Figure 2: Who is retweeting who? |
Remember our initial premise, as described in Part 1, was that attacker groups often use associated hashtags and handles, and the minions that want to be "part of" often retweet and use the hashtag(s). Individual attackers either freely give themselves away, or often become easily identifiable or associated, via Twitter. Note that our dominant retweets are for @joe4security, @HackRead, @defendmalware (not actual attackers, but bloggers talking about attacks, used here for example's sake).
Figure 3 shows us who is mentioning who.
 |
| Figure 3: Who is mentioning who? |
Note that @defendmalware mentions @HackRead. If these were actual attackers it would not be unreasonable to imagine a possible relationship between Twitter accounts that are actively retweeting and mentioning each other before or during an attack. Now let's assume @HackRead might be a possible suspect and you'd like to learn a bit more about possible additional suspects. In reality @HackRead HQ is in Milan, Italy. Perhaps Milan then might be a location for other attackers. I can feed in Twittter handles from my retweet and mentions network above, query the Twitter API with very specific geocode, and lock it within five miles of the center of Milan.
The results are immediate per Figure 4.
 |
| Figure 4: GeoLocation code and results |
Obviously, as these Twitter accounts aren't actual attackers, their retweets aren't actually pertinent to our presumed attack scenario, but they definitely retweeted @computerweekly (seen in retweets and mentions) from within five miles of the center of Milan. If @HackRead were the leader of an organization, and we believed that associates were assumed to be within geographical proximity, geolocation via the Twitter API could be quite useful. Again, these are all used as thematic examples, no actual attacks should be related to any of these accounts in any way.
Fast Frugal Trees (decision trees) for prioritizing criticality
With the abundance of data, and often subjective or biased analysis, there are occasions where a quick, authoritative decision can be quite beneficial. Fast-and-frugal trees (FFTs) to the rescue. FFTs are simple algorithms that facilitate efficient and accurate decisions based on limited information.
Nathaniel D. Phillips, PhD created FFTrees for R to allow anyone to easily create, visualize and evaluate FFTs. Malcolm Gladwell has said that "we are suspicious of rapid cognition. We live in a world that assumes that the quality of a decision is directly related to the time and effort that went into making it.” FFTs, and decision trees at large, counter that premise and aid in the timely, efficient processing of data with the intent of a quick but sound decision. As with so much of information security, there is often a direct correlation with medical, psychological, and social sciences, and the use of FFTs is no different. Often, predictive analysis is conducted with logistic regression, used to "describe data and to explain the relationship between one dependent binary variable and one or more nominal, ordinal, interval or ratio-level independent variables." Would you prefer logistic regression or FFTs?
 |
| Figure 5: Thanks, I'll take FFTs |
Here's a text book information security scenario, often rife with subjectivity and bias. After a breach, and subsequent third party risk assessment that generated a ton of
CVSS data, make a fast decision about what treatments to apply first. Because everyone loves CVSS.
 |
| Figure 6: CVSS meh |
Nothing like a massive table, scored by base, impact, exploitability, temporal, environmental, modified impact, and overall scores, all assessed by a third party assessor who may not fully understand the complexities or nuances of your environment. Let's say our esteemed assessor has decided that there are 683 total findings, of which 444 are non-critical and 239 are critical. Will FFTrees agree? Nay! First, a wee bit of R code.
library("FFTrees")
cvss <- c:="" coding="" csv="" p="" r="" read.csv="" rees="">
cvss.fft <- data="cvss)</p" fftrees="" formula="critical">
plot(cvss.fft, what = "cues")
plot(cvss.fft,
main = "CVSS FFT",
decision.names = c("Non-Critical", "Critical"))
Guess what, the model landed right on
impact and
exploitability as the most important inputs, and not just because it's logically so, but because of their position when assessed for where they fall in the area under the curve (AUC), where the specific curve is the receiver operating characteristic (ROC). The ROC is a "graphical plot that illustrates the diagnostic ability of a binary classifier system as its discrimination threshold is varied." As for the AUC, accuracy is measured by the area under the ROC curve where an area of 1 represents a perfect test and an area of .5 represents a worthless test. Simply, the closer to 1, the better. For this model and data,
impact and
exploitability are the most accurate as seen in
Figure 7.
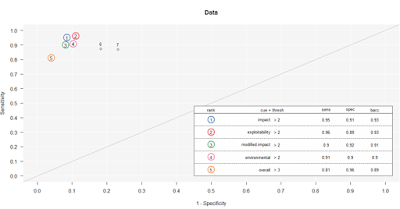 |
| Figure 7: Cue rankings prefer impact and exploitability |
The fast and frugal tree made its decision where impact and exploitability with scores equal or less than 2 were non-critical and exploitability greater than 2 was labeled critical, as seen in
Figure 8.
 |
| Figure 8: The FFT decides |
Ah hah! Our FFT sees things differently than our assessor. With a 93% average for performance fitting (this is good), our tree, making decisions on
impact and
exploitability, decides that there are 444 non-critical findings and 222 critical findings, a 17 point differential from our assessor. Can we all agree that mitigating and remediating critical findings can be an expensive proposition? If you, with just a modicum of data science, can make an authoritative decision that saves you time and money without adversely impacting your security posture, would you count it as a win? Yes, that was rhetorical.
Finally, let's take a look at monitoring user logon anomalies in high volume environments with Time Series Regression (TSR). Much of this work comes courtesy of
Eric Kapfhammer, our lead data scientist on our Microsoft Windows and Devices Group Blue Team. The ideal Windows Event ID for such activity is clearly 4624: an account was successfully logged on. This event is typically one of the top 5 events in terms of volume in most environments, and has multiple type codes including Network, Service, and RemoteInteractive.
User accounts will begin to show patterns over time, in aggregate, including:
- Seasonality: day of week, patch cycles,
- Trend: volume of logons increasing/decreasing over time
- Noise: randomness
You could look at 4624 with a
Z-score model, which sets a threshold based on the number of standard deviations away from an average count over a given period of time, but this is a fairly simple model. The higher the value, the greater the degree of “anomalousness”.
Preferably, via Time Series Regression (TSR), your feature set is more rich:
- Statistical method for predicting a future response based on the response history (known as autoregressive dynamics) and the transfer of dynamics from relevant predictors
- Understand and predict the behavior of dynamic systems from experimental or observational data
- Commonly used for modeling and forecasting of economic, financial and biological systems
How to spot the anomaly in a sea of logon data?
Let's imagine our user, DARPA-549521, in the SUPERSECURE domain, with 90 days of aggregate 4624 Type 10 events by day.
 |
| Figure 9: User logon data |
With 210 line of R, including comments, log read, file output, and graphing we can visualize and alert on DARPA-549521's data as seen in
Figure 10.
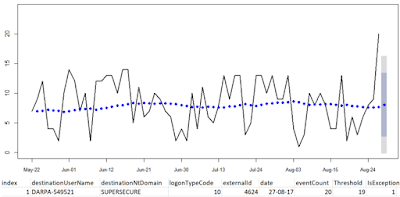 |
| Figure 10: User behavior outside the confidence interval |
We can detect when a user’s account exhibits changes in their seasonality as it relates to a confidence interval established (learned) over time. In this case, on 27 AUG 2017, the user topped her threshold of 19 logons thus triggering an exception. Now imagine using this model to spot anomalous user behavior across all users and you get a good feel for the model's power.
Eric points out that there are, of course, additional options for modeling including:
- Seasonal and Trend Decomposition using Loess (STL)
- Handles any type of seasonality ~ can change over time
- Smoothness of the trend-cycle can also be controlled by the user
- Robust to outliers
- Classification and Regression Trees (CART)
- Supervised learning approach: teach trees to classify anomaly / non-anomaly
- Unsupervised learning approach: focus on top-day hold-out and error check
- Neural Networks
- LSTM / Multiple time series in combination
These are powerful next steps in your capabilities, I want you to be brave, be creative, go forth and add elements of data science and visualization to your practice. R and Python are well supported and broadly used for this mission and can definitely help you detect attackers faster, contain incidents more rapidly, and enhance your in-house detection and remediation mechanisms.
All the code as I can share is
here; sorry, I can only share the TSR example without the source.
All the best in your endeavors!
Cheers...until next time.