Friday, March 01, 2013

toolsmith: Redline, APT1, and you – we’re all owned


Prerequisites/dependencies
Windows OS and .NET 4

Introduction
Embrace this simple fact, we’re all owned. Maybe you aren’t right now, but you probably were at some point or will be in the future. “Assume compromise” is a stance I’ve long embraced, if you haven’t climbed aboard this one-way train to reality, I suggest you buy a ticket. If headlines over the last few years weren’t convincing enough, Mandiant’s APT1, Exposing One of China’s Cyber Espionage Units report should serve as your re-education. As richly detailed, comprehensive, and well-written as it is, this report is groundbreaking in the extent of insights on our enemy it elucidates, but not necessarily as a general concept. Our adversary has been amongst us for many, many years and the problem will get much worse before it gets better. They are all up in your grill, people; your ability to defend yourself and your organizations, and to hunt freely and aggressively is the new world order. I am reminded, courtesy of my friend TJ O’Connor, of a most relevant Patton quote: "a violently executed plan today is better than a perfect plan expected next week." Be ready to execute. Toolsmith has spent six and half years hoping to enable you, dear reader, to execute; take the mission to heart now more than ever.
I’ve covered Mandiant tools before for good reason: RedCurtain in 2007, Memoryze in 2009, and Highlighter in 2011. I stand accused of being a fanboy and hereby render myself guilty. If you’ve read the APT1 report you should have taken immediate note of the use of Redline and Indicators of Compromise (IOCs) in Appendix G. 
Outreach to Richard Bejtlich, Mandiant’s CSO, quickly established goals and direction: “Mandiant hopes that our free Redline tool will help incident responders find intruders on their network. Combining indicators from the APT1 report with Redline’s capabilities gives responders the ability to look for interesting activity on endpoints, all for free.” Well in keeping with the toolsmith’s love of free and open source tools, this conversation led to an immediate connection with Ted Wilson, Redline’s developer, who kindly offered his perspective:
“Working side by side with the folks here at Mandiant who are out there on the front lines every day is definitely what has driven Redline’s success to date.  Having direct access to those with firsthand experience investigating current attack methodologies allows us stay ahead of a very fast moving and quickly evolving threat landscape.  We are in an exciting time for computer security, and I look forward to seeing Redline help new users dive headfirst into computer security awareness.
Redline has a number of impressive features planned for the near future.  Focusing first on expanding the breadth of live response data Redline can analyze.  Some highlights from the next Redline release (v1.8) include full file system and registry analysis capabilities, as well as additional filtering and analysis tools around the always popular Timeline feature.  Further out, we hope to leverage that additional data to provide expanded capabilities that help both the novice and the expert investigators alike.”

Mandiant’s Lucas Zaichkowsky, who will have presented on Redline at RSA by the time you read this, sums up Redline’s use cases succinctly:
1.       Memory analysis from a live system or memory image file. Great for malware analysis.
2.       Collect and review a plethora of forensic data from hosts in order to investigate an incident. This is commonly referred to as a Live IR collector.
3.       Create an IOC search collector to run against hosts to see if any IOCs match.
He went further to indicate that while the second scenario is the most common use case, in light of current events (APT1), the third use case has a huge spotlight on it right now. This is where we’ll focus this discussion to utilize the APT1 IOC files and produce a collector to analyze an APT1 victim.

Installation and Preparation

Mandiant provides quite a bit of material regarding preparation and use of Redline including an extensive user guide, and two webinars well worth taking the time to watch. Specific to this conversation however, with attention to APT1 IOCs, we must prepare Redline for a targeted Analysis Session. The concept here is simple: install Redline on an analysis workstation and prepare a collector for deployment to suspect systems.
To begin, download the entire Digital Appendix & Indicators archive associated with the APT1 report.
Wesley McGrew (McGrew Security) put together a great blog post regarding matching APT1 malware names to publicly available malware samples from VirusShare (which is now the malware sample repository). I’ll analyze a compromised host with one of these samples but first let’s set up Redline.
I organize my Redline file hierarchy under \tools\redline with individual directories for audits, collectors, IOCs, and sessions. I copied Appendix G (Digital) – IOCs from the above mentioned download to APT1 under \tools\redline\IOCs.
Open Redline, and select Create a Comprehensive Collector under Collect Data. Select Edit Your Script and enable Strings under Process Listing and Driver Enumeration, and be sure to check Acquire Memory Image as seen in Figure 1.

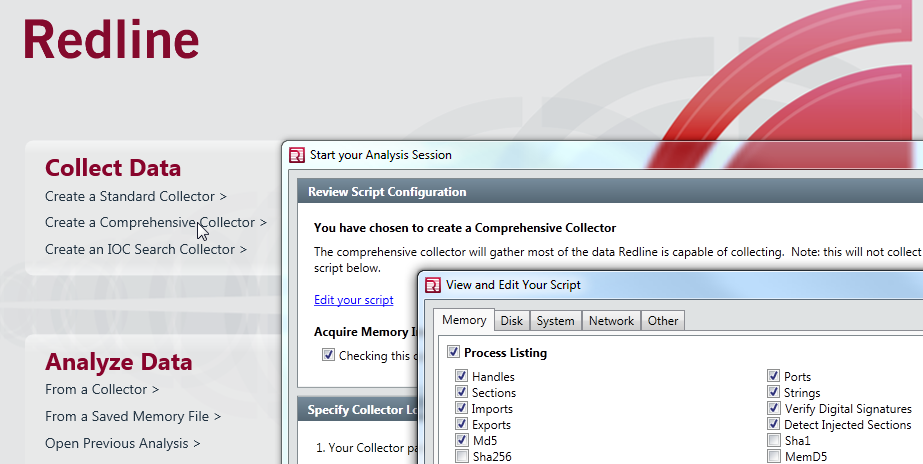
Figure 1: Redline script configuration
I saved the collector as APT1comprehensive. These steps will add a lot of time to the collection process but will pay dividends during analysis. You have the option to build an IOC Search Collector but by default this leaves out most of the acquisition parameters selected under Comprehensive Collector. You can (and should) also add analysis inclusive of the IOCs after acquisition during the Analyze Data phase.

Redline, IOCs, and a live sample

I grabbed the binary 034374db2d35cf9da6558f54cec8a455 from VirusShare, described in Wesley’s post as a match for BISCUIT malware. BISCUIT is defined in Appendix C – The Malware Arsenal from Digital Appendix & Indicators as a backdoor with all the expected functionality including gathering system information, file download and upload, create or kill processes, spawn a shell, and enumerate users. 
I renamed the binary gc.exe, dropped it in C:\WINDOWS\system32, and executed it on a virtualized lab victim. I rebooted the VM for good measure to ensure that our little friend from the Far East achieved persistence, then copied the collector created above to the VM and ran RunRedlineAudit.bat. If you’re following along at home, this is a good time for a meal, walking the dog, and watching The Walking Dead episode you DVR’d (it’ll be awhile if you enabled strings as advised). Now sated, exercised, and your zombie fix pulsing through your bloodstream, return to your victim system and copy back the contents of the audits folder from the collector’s file hierarchy to your Redline analysis station, select From a Collector under Analyze Data, and choose the copied audit as seen in Figure 2.

Figure 2: Analyze collector results with Redline
Specify where you’d like to save your Analysis Session (D:\tools\redline\sessions if you’re following my logic). Let Redline crunch a bit and you will be rewarded with instant IOC goodness. Right out of the gate the report details indicated that “2 out of my 47 Indicators of Compromise have hit against this session.”
Sweet, we see a file hash hit and a BISCUIT family hit as seen in Figure 3.

Figure 3: IOC hits against the Session
Your results will also be written out to HTML automatically. See Report Location at the bottom of the Redline UI. Note that the BISCUIT family hit is identified via UID a1f02cbe. Search a1f02cbe under your IOCs repository and you should see a result such as D:\tools\redline\IOCs\APT1\a1f02cbe-7d37-4ff8-bad7-c5f9f7ea63a3.ioc.
Open the .ioc in your preferred editor and you’ll get a feel for what generates the hits. The most direct markup match is:
034374db2d35cf9da6558f54cec8a455

In the Redline UI, remember to click the little blue button with the embedded i (information) associated with IOC hit for highlights on the specific IndicatorItem that triggered the hit for you and displays full metadata specific to the file, process, or other indicator.

But wait, there’s more. Even without defined, parameterized IOC definitions, you can still find other solid indicators on your own. I drilled into the Processes tab, and selected gc.exe, expanded the selection and clicked Strings.  Having studied Appendix D – FQDNs, and checked out the PacketStash APT1.rules file for Suricata and Snort (thanks, Snorby Labs), I went hunting (CTRL-F in the Redline UI) for strings matches to the known FQDNs. I found 11 matches for purpledaily.com and 28 for newsonet.net as seen in Figure 4.

Figure 4: Strings yields matches too
Great! If I have alert udp $HOME_NET any -> $EXTERNAL_NET 53 (msg:"[SC] Known APT1 domain (purpledaily.com)"; content:"|0b|purpledaily|03|com|00|"…snipped enabled on my sensors I should see all the other systems that may be pwned with this sample. 
Be advised that the latest version of Redline (1.7 as this was written) includes powerful, time-related filtering options including Field Filters, TimeWrinkle, and TimeCrunch. Explore them as you seek out APT1 attributes. There are lots of options for analysis. Read the Redline Users Guide before beginning so as to be full informed. J

In Conclusion

I’m feeling overly dramatic right now. Ten years now I’ve been waiting for what many of us have known or suspected all along to be blown wide open. APT1, presidential decrees, and “it’s not us,” oh my. Mandiant has offered both the fodder and the ammunition you need to explore and inform, so awake! I’ll close with a bit of the Bard (Ariel, from The Tempest):
While you here do snoring lie,
Open-ey'd Conspiracy
His time doth take.
If of life you keep a care,
Shake off slumber, and beware.
Awake, awake!
I am calling you to action and begging of your wariness; your paranoia is warranted. If in doubt of the integrity of a system, hunt! There are entire network ranges that you may realize you don’t need to allow access to or from your network. Solution? Ye olde deny statement (thanks for reminding me, TJ). Time for action; use exemplary tools such as Redline to your advantage, where advantages are few.
Ping me via email if you have questions or suggestions for topic via russ at holisticinfosec dot org or hit me on Twitter @holisticinfosec.
Cheers…until next month.

Acknowledgements

To the good folks at Mandiant:
Ted Wilson, Redline developer
Richard Bejtlich, CSO
Kevin Kin and Lucas Zaichkowsky, Sales Engineers

Monday, February 04, 2013

toolsmith: Social-Engineer Toolkit (SET) - Pwning the Person


Prerequisites/dependencies
Python interpreter
Metasploit
BackTrack 5 R3 also includes SET


Introduction
My first discussion of  Dave Kennedy’s (@dave_rel1k) Social-Engineer Toolkit (SET) came during exploration of the Pwnie Express PwnPlug Elite for March 2012’s toolsmith.  It was there I talked about the Site Cloner feature found under Website Attack Vectors and Credential Harvesting Attack Methods. Unless you’ve been hiding your head in the sand (“if I can’t see the security problem, then it doesn’t exist”) you’re likely aware that targeted attacks such as spear phishing, whaling, and social engineering in general are prevalent. Additionally, penetration testing teams will inevitably fall back on this tactic if it’s left in scope for one reason: it always works. SET serves to increase awareness for all the possible social engineering vectors; trust me, it is useful for striking much fear in the hearts of executives and senior leaders at client, enterprise, and military briefings. It’s also useful for really understanding the attacker mindset. With distributions such at BackTrack including SET, fully configured and ready to go, it’s an absolute no brainer to add to your awareness briefing and/or pen-testing regimen.   
Dave is the affable and dynamic CEO of TrustedSec (@trustedsec) and, as SET’s creator, describes it in his own words:

The Social-Engineer Toolkit has been an amazing ride and the support for the community has been great. When I first started the toolkit, the main purpose was to help out on social engineering gigs but it's completely changed to an entire framework for social-engineering and the community. SET has progressed from a simple set of python commands and web servers to a full suite of attacks that can be used for a number of occasions. With the new version of SET that I'm working on, I want to continue to add customizations to the toolkit where it allows you to utilize the multi attack vector and utilize it in a staged approach that’s all customized. When I'm doing social-engineering gigs, I change my pretext (attack) on a regular basis. Currently, I custom code some of my options such as credential harvester first then followed by the Java Applet. I want to bring these functionalities to SET and continue forward with the ability to change the way the attack works based on the situation you need. I use my real life social-engineering experiences with SET to improve it, if you have any ideas always email me to add features!

Be sure to catch Dave’s presentation videos from DEFCON and DerbyCom, amongst others, on the TrustedSec SET page.

Quick installation notes

It’s easiest to run SET from BackTrack. Boot to it via USB or optical media, or run it as a virtual machine. Navigate to Applications | BackTrack | Exploitation Tools | Social Engineering Tools | Social Engineering Toolkit | set and you’re off to the races.
Alternatively, on any system where you have a Python interpreter and a Git (version control/source code management) client, you can have SET up and running in minutes. Ideally, the system you choose to run SET from should have Metasploit configured too as SET calls certain Metasploit payloads, but it’s not a hard, fast dependency. If no Metasploit, many SET features won’t work, simple. But if you plan to go full goose bozo…you catch my drift.
I installed set on Ubuntu 12.10 as well as Windows 7 64-bit as simply as running git clone https://github.com/trustedsec/social-engineer-toolkit/ set/ from a Bash shell (Ubuntu) or Git Shell (Windows). Note: if you’re running anti-malware on a Windows system where SET is to be installed, be sure to build an exclusion for the SET path or AV will eat some key exploits (six to be exact). A total bonus for you and I occurred as I wrote this. On 24 JAN, Dave released version 4.4.1 of SET, codename “The Goat.” If you read the CHANGES file in SET’s readme directory you’ll learn that this release includes some significant Java Applet updates, encoding and encryption functionality enhancements, and improvements for multi_pyinjector. I updated my BackTrack 5 R3 instance to SET 4.4.1 by changing directory to /pentest/exploits, issuing mv set set_back, then the above mentioned git command. Almost instantly, a shiny new SET ready for a few laps around the track.  Your SET instance needs to be available via the Internet for remote targets to phone home to, or exposed to your local network for enterprise customers. You’ll be presenting a variety of offerings to your intended victims via the SET server IP or domain name.

SET unleashed

Now to rapid fire some wonderful social engineering opportunities at you. How often do you or someone you know wander up to a sign or stop at a web page with a QR code and just automatically scan it with your smart phone? What if I want to send you to any site of my choosing? I’ll simply generate a QR code with the URL destination I want to direct you to. If I’m a really bad human being that site might be offering up the Blackhole exploit kit or something similar. Alternatively, as SET recommends when you choose this module, “when you have the QRCode generated, select an additional attack vector within SET and deploy the QRCode to your victim. For example, generate a QRCode of the SET Java Applet and send the QRCode via a mailer.”
From the SET menu, choose 1) Social-Engineering Attacks, then 9) QRCode Generator Attack Vector, and enter your desired destination URL. SET will generate the QR code and write it to /pentest/exploits/set/reports-qr_attack.png as seen in Figure 1.

Figure 1: QR Code attack generated by SET
From SET’s main menu, 3)Third Party Modules will offer you the RATTE Java Applet Attack (Remote Administration Tool Tommy Edition), and 2) Website Attack Vectors | 1) Java Applet Attack Method will provide templates or site cloning with which you can delivery one heck of a punch via the QR code vector.

Our good friend Java is rife for social engineer targeting opportunities and SET offers mayhem aplenty to capitalize on this fact.  Here’s a sequence to follow from the SET menu:
1) Social-Engineering Attacks | 2) Website Attack Vectors | 1) Java Applet Attack Method | 1) Web Templates

Answer yes or no to NAT/Port Forwarding, enter your SET server IP or hostname, and select 1 for the Java Required template as seen in Figure 2.

Figure 2: Java applet prepped for deployment
You’ll then need to choose what payload you wish to generate. Methinks ye olde Windows Reverse_TCP Meterpreter Shell (#2 on the list) is always a safe bet. Select it accordingly. From the list of encodings, #16 on the list (Backdoored Executable) is described as the best bet. Make it so. Accept 443 as the default listener port and wait while SET generates injection code as seen in Figure 3.

Figure 3: SET-generated injection code
The Metasploit framework will then launch (wake up, Neo...the matrix has you…follow the white rabbit) and the handlers will standby for your victim to come their way.
Now, as the crafty social engineer that you are, you devise an email campaign to remind users of the “required Java update.” By the way, this campaign can be undertake directly from SET as well via 1) Social-Engineering Attacks | 5) Mass Mailer Attack. When one or more of your victims receives the email and clicks the embedded link they’ll be sent to your SET server where much joy awaits them as seen in Figure 4.

Figure 4: Victim presented with Java required and “trusted” applet
When the victim selects Run, and trust me they will, the SET terminal on the SET server will advise you that a Meterpreter session has been opened with the victim as seen in Figure 5.

Figure 5: Anyone want a shell?
For our last little bit of fun, let’s investigate 3) Infectious Media Generator under 1) Social-Engineering Attacks. If you select File-Format Exploits, after setting up your listener, you’ll be presented with a smorgasbord of payload. I selected 16) Foxit PDF Reader v4.1.1 Title Stack Buffer Overflow as I had on old VM with an old Foxit version on it. Sweet! When I opened the fileformat exploit PDF created by SET with the Foxit 4.1.1, well…you know what happened next.
As discussed in the PwnPlug article, don’t forget the Credential Harvester Attack Methods under Website Attack Vectors. This is quite literally my favorite delivery vehicle as it is utterly bomb proof. Nothing like using the templates for your favorite social media sites (you know who you are) and watching as credentials roll in.

In Conclusion

Evil-me really loves SET; it’s more fun than a clown on fire. Remember, as always with tools of this ilk, you’re the good guy in this screenplay. Use SET to increase awareness, put the fear of God in your management, motivate your clients, and school the occasional developer. Anything else is flat out illegal. J As Dave mentioned, if you have ideas for new features or enhancements for SET, he really appreciates feedback from the community.

Ping me via email if you have questions or suggestions for topic via russ at holisticinfosec dot org or hit me on Twitter via @holisticinfosec.
Cheers…until next month.

Acknowledgements

Dave Kennedy, Founder, TrustedSec, SET project lead

Sunday, February 03, 2013

2012 Toolsmith Tool of the Year: ModSecurity for IIS

Congratulations to Ryan Barnett of Trustwave and Greg Wroblewski of Microsoft.
ModSecurity for IIS is the 2012 Toolsmith Tool of the Year.
ModSecurity for IIS finished with 35.4% of the vote, while the Pwnie Express Pwn Plug came in second with 22.8%, and the Arachni Web Application Security Scanner came in third with 18.1% of the votes.

As ModSecurity is best utilized with the OWASP ModSecurity Core Rule Set (CRS), I will make a $50 donation to the CRS Project. I strongly advocate for your supporting this project as well; any amount will help.

Congratulations and thank you to all of this year's participants; we'll have another great round in 2013.


Thursday, January 03, 2013

toolsmith: Violent Python - A Book Review Applied to Security Analytics


Prerequisites/dependencies
Python interpreter
BackTrack 5 R3 is ideally suited to make immediate use of Violent Python scripts

Introduction
Happy New Year and congratulations on surviving the end of the world as we know it (nyah, nyah Mayan calendar). Hard to imagine we’re starting yet another year already; 2012 simply screamed by. Be sure to visit the HolisticInfoSec blog post for the 2012 Toolsmith Tool of the Year and vote for your favorite tool of 2012.
I thought I’d start off 2013 with a bit of a departure from the norm. Herein is the first treatment of a book as a tool where the content and associated code can be utilized to perform duties specific to the information security practitioner. I can think of no better book with which to initiate this approach than TJ O’Connor’s Violent Python, A Cookbook for Hackers, Forensic Analysts, Penetration Testers, and Security Engineers. Yes, this implies that you should buy the book; trust me, it’s worth every dime of the $34. Better still, TJ has donated all his proceeds to the Wounded Warrior Project. That said, I’ll post TJ’s three scripts we’ll discuss here so as to whet your appetite. I’ve had the distinct pleasure of working with TJ as part of the SANS Technical Institute’s graduate program where we, along with Beth Binde, wrote AssessingOutbound Traffic to Uncover Advanced Persistent Threat. I’ve known some extremely bright capable information security experts in my day and I can comfortably say TJ is hands down amongst the very best of that small group. As part of his service as an officer in the U.S. Army (hooah) TJ has served as the course director for both computer exploitation and digital forensics at the US Military Academy and as an communications officer supporting tactical communications. His book maps nicely to a philosophy I embrace and incorporate in the workplace. Security monitoring, incident response (and forensics), and attack and penetration testing are the three pillars of security analytics, each feeding and contributing the others in close cooperation. As an example, capable security monitoring inevitably leads to a need for incident response, and after mitigation and remediation have ensued, penetration testing is key to validating that corrective measures were successful, which in turn helps the monitoring team assess and tune detection and alerting logic. Security analytics: the information security circle of life J.
How does a book such as TJ’s Violent Python reverberate with this philosophy? How about entire chapters dedicated to each of the above mentioned pillars, including Python scripts for network traffic analysis (monitoring), forensic investigations (IR), as well as web recon and penetration testing. We’ll explore one script from each discipline shortly, but not before hearing directly from the author:
“In a lot of ways writing a book is a cathartic experience where you capture a lot of things you have done. All too often I'm writing scripts to achieve an immediate effect and then I throw away the script. For me the book was an opportunity to capture a lot of those small projects I've done and simplify the learning curve for others. My favorite example was the UAV takeover in the book. We show how to take over any really Ad-Hoc WiFi toys in under 70 lines of code. A few friends joked that I couldn't write a script in under 100 lines to crash a UAV. This was my chance to provide them a working concept and it worked! Unfortunately it left my daughter with a toy UAV cracked into several pieces as I refined the code. From a defensive standpoint, understanding a scripting language is absolutely essential in my opinion. The ability to parse data such as DNS traffic or geo-locate IP traffic (both shown in the book) can give a great deal of visibility. Forensics tools are great but the ability to build your own are even better. We show how to write tools to parse out iPhone backups for data and scrape for specific objects. The initial feedback from the book has been overwhelming and I've really enjoyed hearing positive feedback. No future plans right now but a good friend of mine has mentioned writing "Violent Powershell" so we'll see where that goes.”    
Violent Python provides readers the basis for scripts to attack network services, analyze digital artifacts, investigate network traffic for malicious activity, and data-mine social media, not to mention numerous other activities. This is a must-read book that includes a companion site with all the code discussed. Let’s take a closer look at three of these efficient and useful Python scripts.

Making Use of Violent Python

As noted above, I’ve posted the three scripts discussed in this section, along with the PCAP and PDF (malicious) discussed on my website. Email or Tweet for the zip passwords.
TJ suggests utilizing a BackTrack distribution given that many of the dependencies and libraries required to use the scripts in this book are inherent to BackTrack. We’ll follow suit on a BackTrack 5 R3 virtual machine. Before beginning, we’ll need to set up a few prerequisites. Execute easy_install pyPDF python-nmap pygeoip mechanize BeautifulSoup4 at the BT5R3 root prompt. This will install pygeoip as needed for our first exercise. I’m going to conduct these exercises a bit out of chapter sequence in order to follow the security analytics lifecycle starting with monitoring. This drops us first into Chapter 4 where we’ll utilize MaxMind’s GeoLiteCity to map IP addresses to cities. In order to do so, you’ll need to set up GeoLiteCity on BackTrack or your preferred system with the following steps:
1.  mkdir /opt/GeoIP
2.  cd /opt/GeoIP/
3.  wget http://geolite.maxmind.com/download/geoip/database/GeoLiteCity.dat.gz
4.  gunzip GeoLiteCity.dat.gz
You’ll then need to edit line 7 of geoPrint.py to read gi = pygeoip.GeoIP('/opt/GeoIP/GeoLiteCity.dat') or download the updated copy of the script I’ve posted for you.

I’ve created a partially arbitrary scenario for you with which to walk through the security analytics lifecycle using Violent Python. To do so I’ll refer to what was, in 2009 an actual malicious domain, used to host shellcode for PDF-based malware attacks. I grabbed a malicious PDF sample from Contagio, an excellent sample resource. The IP address I associate with this domain is where I am taking creative liberties as the domain we’ll discuss, ax19.cn, no longer exists, and there is no record of what its IP address was when it was in use. The PCAP we’ll use here is one I edited with bittwiste to arbitrarily introduce a suspect Chinese IP address to what was originally a packet capture from a machine compromised by Win32.Banload.MC. I’ve shared this PCAP and the PDF as mentioned above so you can try the Python scripts with them for yourself.  
In this scenario, your analysis machine is Linux only. Just you, a Python interpreter, and a shell; no fuss, no muss.
As we’re starting in the monitoring phase, imagine you have a network for which the traffic baseline is well understood. You can assert, from one particular high value VLAN, that at no time should you ever see traffic bound for China.  Your netflow monitoring for that VLAN is showing far more egress traffic bound for IP space that is not on your approved list established from learned baselines. You initiate a real-time packet capture to confirm. Capture (suspect.pcap) in hand, you’d like to validate that the host is indeed conversing with an IP address in China. Violent Python’s geoPrint.py script is a great place to start as it leverages the above-mentioned GeoLiteCity data from MaxMind along with the PyGeoIP library from Jennifer Ennis and dpkt. Execute python geoPrint.py -p suspect.pcap and you’ll see results as noted in Figure 1.

Figure 1: geoPrint.py confirms Chinese takeout
Your internal host (RFC 1918, and thus unregistered) with IP address 192.168.248.114 is clearly conversing with 116.254.188.24 in Beijing. Uh-oh.
Your team now moves into incident response mode and seizes the host in question. You interview the system’s user who indicates they received an email what the user thought was a legitimate help desk notification to read a new policy. The email had an attached PDF file which the user downloaded and opened. Your suspicions are heightened, as such you grab a copy of the PDF and head back to your analysis workstation. You’re interested to see if there is any interesting metadata in the PDF that might help further your investigation. You refer to Chapter 3 of Violent Python which discusses Forensic Investigations with Python. The pdfRead.py script incorporates the PyPDF library which allows you to extract PDF document information (metadata) in addition to other capabilities. Execute python pdfRead.py -F suspect.pdf and dump the metadata as seen in Figure 2.

Figure 2: pdfRead.py dumps suspect PDF metadata
The author reference is a standout for you; from a workstation with a browser you search “Zeon Technical Publications” and find reference to it on VirusTotal and JSunpack; these results along with a quick MD5sum hash match indicate that this PDF is clearly malicious. The JSunpack reference indicates that shellcode phones home to www.ax19.cn (see Figure 3), a domain for which you’d now like to learn more.

Figure 3: JSunpack confirms an evil PDF
You could have sought anonymity to conduct the above mentioned search, which lead us to the third pillar of our security analytics lifecycle. This third phase here includes web recon as discussed in Chapter 6 of Violent Python, a common step in the attack and penetration testing discipline, to see what more we can learn about this malicious domain. As we often seek anonymity during the recon phase, Violent Python allows you maintain a bit of stealth by leveraging the deprecated Google API against which a few queries a day can still be executed. The newer API requires a developer’s key which one can easily argue is not anonymous. Executing python anonGoogle.py -k 'www.ax19.cn' will return yet another validating result as seen in Figure 4.

Figure 4: anonGoogle matches ax19.cn to malicious activity
With seven rich chapters of Python goodness, TJ’s Violent Python represents a golden opportunity to expanding your security analytics horizons. There is so much to learn from here while accentuating your use of Python in your information security practice.

In Conclusion

I’m hopeful this slightly different approach to toolsmith was useful for you this month. I’m looking to shake things up a bit here in 2013 and am certainly open to suggestions you may have regarding ideas and approaches to doing so. Violent Python was a great read for me and a pleasure to put to use for both this article as well as in my personal tool box. I’m certain you’ll find this book equally useful.
Ping me via email if you have questions (russ at holisticinfosec dot org).
Cheers…until next month.

Acknowledgements

TJ O’Connor, Violent Python author
Mila Parkour, Contagio

Moving blog to HolisticInfoSec.io

toolsmith and HolisticInfoSec have moved. I've decided to consolidate all content on one platform, namely an R markdown blogdown sit...