You've likely seen chatter recently regarding the pilot Hack the Pentagon bounty program that just wrapped up, as facilitated by HackerOne. It should come as no surprise that the most common vulnerability reported was cross-site scripting (XSS). I was invited to participate in the pilot, yes I found and submitted an XSS bug, but sadly, it was a duplicate finding to one already reported. Regardless, it was a great initiative by DoD, SecDef, and the Defense Digital Service, and I'm proud to have been asked to participate. I've spent my share of time finding XSS bugs and had some success, so I'm always happy when a new tool comes along to discover and help eliminate these bugs when responsibly reported.
XssPy is just such a tool.
A description as paraphrased from it's Github page:
XssPy is a Python tool for finding Cross Site Scripting vulnerabilities. XssPy traverses websites to find all the links and subdomains first, then scans each and every input on each and every page discovered during traversal.
XssPy uses small yet effective payloads to search for XSS vulnerabilities.
The tool has been tested in parallel with commercial vulnerability scanners, most of which failed to detect vulnerabilities that XssPy was able to find. While most paid tools typically scan only one site, XssPy first discovers sub-domains, then scans all links.
XssPy includes:
1) Short Scanning
2) Comprehensive Scanning
3) Subdomain discovery
4) Comprehensive input checking
XssPy has discovered cross-site scripting vulnerabilities in the websites of MIT, Stanford, Duke University, Informatica, Formassembly, ActiveCompaign, Volcanicpixels, Oxford, Motorola, Berkeley, and many more.
Install as follows:
git clone https://github.com/faizann24/XssPy/ /opt/xsspy
Python 2.7 is required and you should have mechanize installed. If mechanize is not installed, type pip install mechanize in the terminal.
Run as follows:
python XssPy.py website.com (no http:// or www).
Let me know what successes you have via email or Twitter and let me know if you have questions (russ at holisticinfosec dot org or @holisticinfosec).
Cheers…until next time.

Russ McRee's HolisticInfoSec™ includes articles and research, as well as feedback and an occasional rant. HolisticInfoSec™ promotes standards, simplicity, tooling and efficiency in achieving holistic information security.
Showing posts with label XSS. Show all posts
Showing posts with label XSS. Show all posts
Wednesday, June 22, 2016
Sunday, March 02, 2014
toolsmith: SpiderFoot

Prerequisites/dependencies
Python 2.7 if running on *nix as well as M2Crypto,
CherryPy, netaddr, dnspython, and Mako modules
Windows version comes as a pre-packaged executable, no
dependencies
Introduction
All good penetration tests and threat assessments should
be initiated with what you’ve seen referred to in toolsmith as OSINT, or open
source intelligence gathering. This practice contributes greatly to collecting
a useful list of targets of opportunity. One key element to remember though,
the bad guys are conducting this same activity against you and your
Internet-facing assets too. It’s probably best then that you develop your own
OSINT practice so you can find the information you may not wish to, or even
know, you are exposing. Steve Micallef’s SpiderFoot is another tool in the
arsenal specific to this cause. You may already be aware that the four phases
of a web application security assessment, as defined using the SamuraiWTF
distribution, are recon, mapping, discovery, and exploitation. The SANS GIAC
Certified Web Application Penetration Tester (GWAPT) curriculum follows suit
given that Secure Idea’s Kevin Johnson contributed heavily (developed) to both.
SpiderFoot nicely blends both recon and mapping as part of its feature set. As
we consider legal, privacy, and ethics issues for the March ISSA Journal, OSINT
and reconnaissance become interesting and related topics. I have, on more than
one occasion, discovered very damaging data via OSINT tactics that, if in the
wrong hands, could have been very damaging. When you consider findings of this
nature with regard to ethics and the legality you may find yourself in an
immediate quandary. Are you obligated to report findings that you know could
cause harm to the target if left unmitigated? What if during your analysis you
come into possession of classified or proprietary information that having in
your possession could create legal challenges for you? Imagine findings of this
caliber and it becomes easy to recognize why you should always conduct
intelligence gathering and footprinting on your own interests before the wrong
people do it for you. SpiderFoot, as a tool for just such purposes, allows you
to understand “as much as possible about a given target in order to perform a
more complete security penetration test.” For large networks, this can be a
daunting task, and SpiderFoot automates this process significantly, allowing
penetration testers to focus their efforts on security testing itself.
Steve provided us with some SpiderFoot history as well as
insight on what he finds useful and interesting. He originally wrote SpiderFoot
as a C# .NET application in 2005, purely as an exercise to learn C#, having
been inspired by BiDiBLAH’s developers from Sensepost (who went on to create
Maltego), thinking he could make a lighter open source version. For seven years
that was Steve’s first and only release until he decided to resume development
again in 2012. His work on next generation versions have led SpiderFoot to be
cross platform (Python), far more extensible, functional, with a much nicer user
interface (UI).
Steve’s current challenge with SpiderFoot is deciding
what cool functionality to implement next, his to-do list is ever growing and
there are a numerous features he’d love to extend it to include. He typically
balances his time between UI/analysis functionality versus new checks to identify
more items to aid the penetration tester. The aforementioned OSINT (Open Source
Intelligence) community also continues to produce new sources which in turn inspire
Steve to build new SpiderFoot checks.
He finds it interesting testing out a new module, and
actually finding insightful items out there on the Internet simply during the
development process. Steve’s favorite functionality at the moment is
identifying owned netblocks, and co-hosted sites. Owned Netblocks indicates entire IP ranges that an
organization owns, which enables penetration testers to more completely scan
the perimeter of a target. Co-hosted Sites
shows you any websites on the same server as the target, which can also be
revealing. If your target is hosted on the same server as sites identified as
being malicious by the malicious site checker, or the blacklist checker plug-in
it could potentially indicate that your target is hosted on a compromised
server.
As you read this it’s likely that the following planned
enhancements are available in SpiderFoot or will be soon:
·
2.1.2 (early March)
o SOCKS
proxy support
o Real-time
scan progress viewer
o Identify
scan quality impacting issue
o Autoshun
(www.autoshun.org) lookup as part of malicious checks
o SANS
(isc.sans.edu) lookup as part of malicious checks (queue the Austin Powers
voice: “Yeah, baby!”)
o Update
GeoIP checker
·
2.1.3 (mid April)
o VirusTotal,
SHODAN, Facebook, Xing, Pastebin and GitHub plug-ins
Note that when you pull SpiderFoot from GitHub, you are downloading a beta version of the next release, as Steve commits
new functionality there periodically in preparation for the next
version. For instance, SOCKS functionality is in the GitHub repository right now
but not in the packaged released version (2.1.1.).
SpiderFoot is a great project with a strong development
roadmap, so let’s get down to business and explore.
Quick installation
notes
Windows installation is an absolute no brainer; download the
package, unpack it, execute sf.exe,
and browse to http://127.0.0.1:5001. All
dependencies are met including a standalone Python interpreter, so you may find
this option optimal.
Linux (I installed it on SamuraiWTF) users need to settle
a few dependencies easily solved with the following few steps that assume pip is already installed:
sudo apt-get
install swig
sudo pip install
mako cherrypy netaddr M2Crypto dnspython
git clone
https://github.com/smicallef/spiderfoot.git
cd spiderfoot/
sudo python
./sf.py 0.0.0.0:9999
The last line indicates that you’d like SpiderFoot to
bind to all addresses (including localhost) and listen on port 9999. You can
define your preferred port or just accept default if undefined (5001). Steve
reminds us on his installation page to be
cautious regarding exposing SpiderFoot to hostile networks (Intranet, security
conference wireless) given that there is currently no authentication scheme.
SpiderFoot
unleashed
The SpiderFoot UI is, how shall I say, incredibly simple,
intuitive, and obvious even. To start a scan…wait for it…select New Scan. Figure 1 represents a scan
being kicked off on my domain (don’t do it) as defined by the By Module view.
 |
| FIGURE 1: Kicking off a new scan with SpiderFoot |
 |
| FIGURE 2: SpiderFoot Scans view |
If need be (default settings
work quite well), you can tune the actual scan configuration as well via
Settings, with attention to how you’d like to tune storage, search engines,
port scanning, spidering, TLD searches (see Figure 3), amongst others.
 |
| FIGURE 3: SpiderFoot Settings view |
 |
| FIGURE 4: SpiderFoot results and export functionality |
As I navigated all the
results, I was intrigued to find a hit for URL
(Uses Flash) simply because I didn’t recall any Flash features on my
site. I immediately chuckled when I reviewed the result as it
was specific to a Flash video I’d
created for the 2008 ISSA Northwest Regional Conference wherein I ripped on the
now defunct Hacker Safe trustmark for indicating that their customer’s sites
were “hacker safe” when, in fact, they were not. Oh, the good old days.
Want to visualize your
results? No problem, you can choose from a bubble view of data elements or the
discovery path. Figure 5 represents the discovery path for Social Media Presence findings. Hover
over each entity for details specific to initial target type, the source
module, and the related result.
 |
| FIGURE 5: SpiderFoot visualizes a discovery path |
SpiderFoot will absolutely
uncover nuggets you may have long forgotten about and may want to remove as
they are potentially vulnerable (outdated plugins, modules, etc.) or
unnecessarily/unintentionally exposed. I found an old dashboard I’d built by
hand eons ago with long dead extenal JavaScript calls that had no business
still being available. “Be gone!”, I said. That is what SpiderFoot is all
about. Add it to the tool collection for penetration tests and OSINT
expeditions; you won’t be disappointed.
In Conclusion
Steve Micallef’s SpiderFoot is functionally simple but
feature rich and getting better all the time as it is well built and
maintained. Follow @binarypool on Twitter and keep an eye out for timely and
regular releases.
Ping me via email if you have questions or suggestions
for topic via russ at holisticinfosec dot org or hit me on Twitter @holisticinfosec.
Cheers…until next month.
Acknowledgements
Steve Micallef (@binarypool),
Spiderfoot author
Friday, November 01, 2013
toolsmith: OWASP Xenotix XSS Exploit Framework
Prerequisites
 Again, entirely accurate. The Information
Gathering modules also include WAF
Fingerprinting, as well as Ping,
Port, and Internal Network Scans. Remember that,
as is inherent to its very nature, these scans occur in the context of the
victimized browser’s system as a function of cross-site scripting.
Again, entirely accurate. The Information
Gathering modules also include WAF
Fingerprinting, as well as Ping,
Port, and Internal Network Scans. Remember that,
as is inherent to its very nature, these scans occur in the context of the
victimized browser’s system as a function of cross-site scripting.

Current Windows operating system
Introduction
Hard to believe this month’s toolsmith marks seven full
years of delivering dynamic content and covering timely topics on the perpetually
changing threat-scape information security practitioners face every day. I’ve
endeavored to aid in that process 94 straight months in a row, still enjoy
writing toolsmith as much as I did day one, and look forward to many more to
come. How better to roll into our eighth year than by zooming back to one of my
favorite topics, cross-site scripting (XSS), with the OWASP Xenotix XSS Exploit
Framework. I’d asked readers and Twitter followers to vote for November’s topic
and Xenotix won by quite a majority. This was timely as I’ve also seen renewed
interest in my Anatomy of an XSS Attack
published in the ISSA Journal more than five years ago in June 2008. Hard to
believe XSS vulnerabilities still prevail but according to WhiteHat Security’s
May 2013 Statistics report:
1) While
no longer the most prevalent vulnerability, XSS is still #2 behind only Content
Spoofing
2) While
50% of XSS vulnerabilities were resolved, up from 48% in 2011, it still took an
average of 227 for sites to deploy repairs
Per the 2013 OWASP Top 10, XSS is
still #3 on the list. As such, good tools for assessing web applications for
XSS vulnerabilities remain essential, and OWASP Xenotix XSS Exploit Framework
fits the bill quite nicely.
Ajin Abraham (@ajinabraham) is Xenotix’s developer and project lead; his
feedback on this project supports the ongoing need for XSS awareness and
enhanced testing capabilities.
According to Ajin, most of the current pool of web application
security tools still don't give XSS the full attention it deserves, an
assertion he supports with their less than optimal detection rates and a high
number of false positive. He has found that most of these tools use a payload
database of about 70-150 payloads to scan for XSS. Most web application scanners,
with the exception of few top notch proxies such as OWASP ZAP and
Portswigger’s Burp Suite, don't provide
much flexibility especially when dealing with headers and cookies. They typically
have a predefined set of protocols or rules to follow and from a penetration
tester’s perspective can be rather primitive. Overcoming some of these shortcomings
is what led to the OWASP Xenotix XSS Exploit Framework.
Xenotix is a penetration testing tool developed
exclusively to detect and exploit XSS vulnerabilities. Ajin claims that Xenotix
is unique in that it is currently the only XSS vulnerability scanner with zero false
positives. He attributes this to the fact that it uses live payload reflection-based
XSS detection via its powerful triple browser rendering engines, including
Trident, WebKit and Gecko. Xenotix apparently has the
world's second largest XSS payload database, allowing effective XSS detection
and WAF bypass. Xenotix is also more than a vulnerability scanner as it also includes
offensive XSS exploitation and information gathering modules useful in
generating proofs of concept.
For feature releases Ajin intends to implement additional
elements such as an automated spider and an intelligent scanner that can choose
payloads based on responses to increase efficiency and reduce overall scan
time. He’s also working on an XSS payload inclusive of OSINT gathering which
targets certain WAF's and web applications with specific payloads, as well as a
better DOM scanner that works within the browser. Ajin welcomes support from
the community. If you’re interested in the project and would like to contribute
or develop, feel free to contact him via @ajinabraham, the OWASP Xenotix site, or the
OpenSecurity site.
Xenotix Configuration
Xenotix installs really easily. Download the latest
package (4.5 as this is written), unpack the RAR file, and execute Xenotix XSS Exploit Framework.exe. Keep in
mind that antimalware/antivirus on Windows systems will detect xdrive.jar as a Trojan Downloader.
Because that’s what it is. ;-) This is an enumeration and exploitation tool
after all. Before you begin, watch Ajin’s YouTube video
regarding Xenotix 4.5 usage. There is no written documentation for this tool so
the video is very helpful. There are additional videos for
older editions that you may find useful as well. After installation, before you
do anything else, click Settings,
then Configure Server, check the
Semi Persistent Hook box, then
click Start. This will allow you
to conduct information gathering and exploitation against victims once you’ve
hooked them.
Xenotix utilizes the Trident engine (Internet Explorer
7), the Webkit engine (Chrome 25), and the Gecko engine (Firefox 18), and
includes three primary module sets: Scanner,
Information Gathering, and XSS Exploitation as seen in Figure 1.
 |
| FIGURE 1: The Xenotix user interface |
We’ll walk through examples of each below while taking
advantage of intentional XSS vulnerabilities in the latest release of OWASPMutillidae II: Web Pwn in Mass Production. We
covered Jeremy Druin’s (@webpwnized) Mutillidae in August 2012’s toolsmith and it’s
only gotten better since.
Xenotix Usage
These steps assume you’ve installed Mutillidae II
somewhere, ideally on a virtual machine, and are prepared to experiment as we
walk through Xenotix here.
Let’s begin with the Scanner
modules. Using Mutillidae’s DNS Lookup
under OWASP Top 10 à A2 Cross Site Scripting (XSS) à Reflected (First Order) à DNS Lookup. The vulnerable GET
parameter is page and on POST is
target_host. Keep in mind that as
Xenotix will confirm vulnerabilities across all three engines, you’ll be hard
pressed to manage output, particularly if you run in Auto Mode; there is no real reporting function with this
tool at this time. I therefore suggest testing in Manual Mode.
This allows you to step through each payload and as seen Figure 2, we get our
first hit with payload 7 (of 1530).
 |
| FIGURE 2: Xenotix manual XSS scanning |
You can also try the XSS
Fuzzer where you replace parameter values with a marker, [X], and fuzz
in Auto Mode. The XSS Fuzzer allows you to skip ahead to
a specific payload if you know the payload position index. Circling back to the
above mentioned POST parameter, I used the POST
Request Scanner to build a request, establishing http://192.168.40.139/mutillidae/index.php?page=dns-lookup.php
as the URL and setting target_host
in Parameters. Clicking POST
then populated the form as noted in Figure 3 and as with Manual mode, our first
hits came with payload 7.
 |
| FIGURE 3: Xenotix POST Request Scanner |
You can also make use of Auto
Mode, as well as DOM, Multiple Parameter, and Header Scanners, as well as a Hidden Parameter Detector.
The Information
Gathering modules are where we can really start to have fun with
Xenotix. You first have to hook a victim browser to make use of this tool set.
I set the Xenotix server to the host IP where Xenotix was running (rather than
the default localhost setting) and checked the Semi
Persistent Hook checkbox. The resulting payload of
 was then used with Mutillidae’s Pen
Test Tool Lookup to hook a victim browser on a different system running
Firefox on Windows 8.1. With the browser at my beck and call, I clicked Information Gathering where the Victim Fingerprinting module produced:
was then used with Mutillidae’s Pen
Test Tool Lookup to hook a victim browser on a different system running
Firefox on Windows 8.1. With the browser at my beck and call, I clicked Information Gathering where the Victim Fingerprinting module produced:

Saving the most fun for last,
let’s pwn this this thang! A quick click of XSS
Exploitation offers us a plethora of module options. Remember, the
victim browser is still hooked (xooked) via:
 I sent my victim browser a message as depicted in Figure 4 where I snapped the Send Message configuration and the
result in the hooked browser.
I sent my victim browser a message as depicted in Figure 4 where I snapped the Send Message configuration and the
result in the hooked browser.
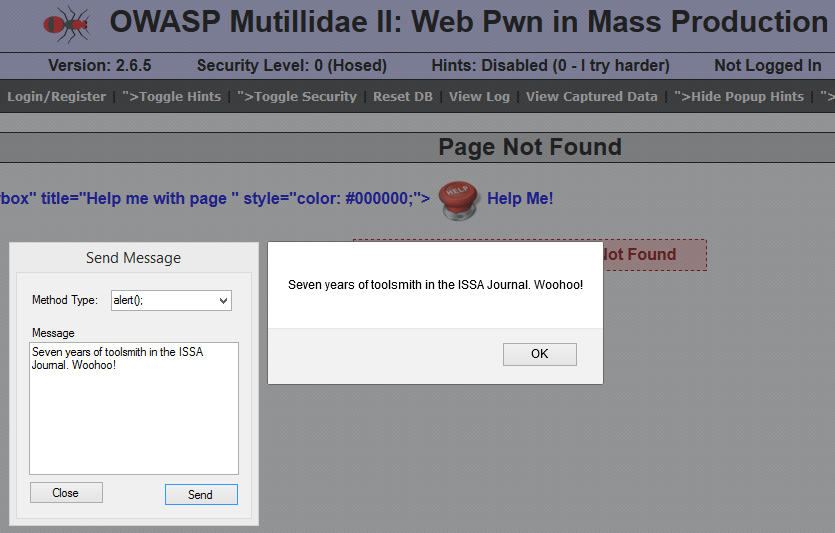 |
| FIGURE 4: A celebratory XSS message |
Message boxes are cute, Tabnabbing
is pretty darned cool, but what does real exploitation look like? I first fired
up the Phisher module with
Renren (the Chinese Facebook) as my target site, resulting in a Page Fetched and Injected message and
Renren ready for login in the victim browser as evident in Figure 5. Note that
my Xenotix server IP address is the destination IP in the URL window.
 |
| FIGURE 5: XSS phishing Renren |
But wait, there’s more. When
the victim user logs in, assuming I’m also running the Keylogger module, yep,
you guessed it. Figure 6 includes keys logged.
 |
| FIGURE 6: Ima Owned is keylogged |
Your Renren is my Renren.
What? Credential theft is not enough for you? You want to deliver an executable
binary? Xenotix includes a safe, handy sample.exe
to prove your point during demos for clients and/or decision makers. Still not
convinced? Need shell? You can choose from JavaScript,
Reverse HTTP, and System Shell Access. My favorite, as
shared in Figure 7, is reverse shell via a Firefox bootstrapped add-on as
delivered by XSS Exploitation --> System Shell Access --> Firefox Add-on Reverse Shell. Just Start Listener, then Inject (assumes a hooked browser).
 |
| FIGURE 7: Got shell? |
Assuming the victim happily
accepts the add-on installation request (nothing a little social engineering
can’t solve), you’ll have system level access. This makes pentesters very
happy. There are even persistence options via Firefox add-ons, more fun than a
frog in a glass of milk.
In Conclusion
While this tool won’t replace proxy scanning platforms
such as Burp or ZAP, it will enhance them most righteously. Xenotix is GREAT
for enumeration, information gathering, and most of all, exploitation. Without
question add the OWASP Xenotix XSS Exploit Framework to your arsenal and as
always, have fun but be safe. Great work, Ajin, looking forward to more, and
thanks to the voters who selected Xenotix for this month’s topic. If you have
comments, follow me on Twitter via @holisticinfosec or email if you have
questions via russ at holisticinfosec dot org.
Cheers…until next month.
Acknowledgements
Ajin Abraham, Information
Security Enthusiast and Xenotix project lead
Friday, November 02, 2012
toolsmith: Arachni - Web Application Security Scanner
Part 1 of 2 - Web Application Security
Flaw Discovery and Prevention

Prerequisites/dependencies
Ruby 1.9.2 or higher in any *nix environment
Introduction
This month’s issue kicks off a two part series on web
application security flaw discovery and prevention, beginning with Arachni. As
this month’s topic is another case of mailing lists facilitating great
toolsmith topics, I’ll begin this month by recommending a few you should join
if you haven’t already. The Web Application Security Consortium mailing list is a
must, as are the SecurityFocus lists. I favor
their Penetration Testing and Web Application Security lists but they have many
others as well. As you can imagine, these two make sense for me given focuses
on web application security and penetration testing, and it was via
SecurityFocus that I received news of the latest release of Arachni. Arachni is
a high-performance, modular, open source web application security scanning
framework written in Ruby. It was refreshing to discover a web app scanner I
had not yet tested. I spend a lot of time with the likes of Burp, ZAP, and
Watobo but strongly advocate expanding the arsenal.
Arachni’s developer/creator is Tasos "Zapotek"
Laskos, who kindly provided details on this rapidly maturing tool and project.
Via email, Tasos indicated that to date, Arachni's role has
been that of an experiment/learning-exercise hybrid, mainly focused on doing
things a little bit differently. He’s glad to say that the fundamental project
goals have been achieved; Arachni is fast, relatively simple, quite accurate, open
source and quite flexible in the ways which it can be deployed. In addition, as
of late, stability and testing have been given top priority in order to ensure
that the framework won't exhibit performance degradation as the code-base
expands.
With a strong foundation laid and a clear road map,
future plans for Arachni include pushing the envelope where version 0.4.2 include
improved distributed, high-performance scan features such as the new,
distributed crawler
(under current development), and a new, cleaner, more stable and attractive Web
User Interface, as well as general code clean-up.
Version 0.5 is where a lot of interesting work will take
place as the Arachni team will be attempting to break some new ground with
native DOM and JavaScript support, with the intent of allowing a depth/level of
analysis beyond what's generally possible today, from either open source or
commercial systems. According to Tasos, most, if not all, current scanners rely
on external browser engines to perform their duties bringing with them a few
penalties (performance hits, loss of control, limited inspection capabilities, design
compromises, etc.), which Arachni will be able to avoid. This kind of
functionality, especially from an open and flexible system, will be greatly
beneficial to web application testing in general, and not just in a security-related
context.
Arachni success stories include incredibly cool features
such as WAF Realtime Virtual Patching. At
OWASP AppSec DC 2012,
Trustwave Spider Lab’s Ryan Barnett discussed the concept of dynamic
application scanning testing (DAST) exporting data that is then imported into a
web application firewall (WAF) for targeted remediation. In addition to stating
that the Arachni scanner is an “absolutely awesome web application scanner
framework” Ryan describes how to integrate export data from Arachni with
ModSecurity, the WAF for which he is OWASP ModSecurity Core Rule Set (CRS)
project leader. Take note here as next month in toolsmith we’re going to
discuss ModSecurity for IIS as part two of this series and will follow Ryan’s
principles for DAST to WAF.
Other Arachni successes include highly-customized
scripted audits and easy incorporation into testing platforms (by virtue of its
distributed features). Tasos has
received a lot of positive feedback and has been pleasantly surprised there has
not been one unsatisfied user, even in the Arachni's early, immature phases.
Many Arachni users end up doing so out of frustration with the currently
available tools and are quite happy with the results after giving Arachni a try
given that Arachni gives users a decent alternative while simplifying web application
security assessment tasks.
Arachni benefits from excellent documentation and support
via its wiki,
be sure to give a good once over before beginning installation and use.
Installing Arachni
On an Ubuntu 12.10 instance,
I first made sure I had all dependencies met via sudo
apt-get install build-essential libxml2-dev libxslt1-dev libcurl4-openssl-dev
libsqlite3-dev libyaml-dev zlib1g-dev ruby1.9.1-dev ruby1.9.1.
For developer’s sake, this
includes Gem support so thereafter one need only issue sudo gem install arachni to install Arachni. However, the
preferred method is use of the appropriate system packages from the latest
downloads page.
While Arachni features robust
CLI use, for
presentation’s sake we’ll describe Arachni use with the Web UI. Start
it via arachni_web_autostart
which will initiate a Dispatcher and the UI server. The last step is to point
your browser to http://localhost:4567,
accept the default settings and begin use.
Arachni in use
Of interest as you begin
Arachni use is the dispatcher which spawns RPC instances and allows you to attach
to, pause, resume, and shutdown Arachni instances. This is extremely important
for users who wish to configure Arachni instances in a high performance grid (think
a web application security scanning cluster with a master and slave
configuration). Per the wiki, “this allows scan-time to be severely decreased,
by as much as n times less under ideal circumstances, where n
equals the number of running instances.”
You can configure Arachni’s
web UI to run under SSL and provide HTTP Basic authentication if you wish to
lock use down. Refer to the wiki entry for the web user interface for more
details.
Before beginning a simple
scan (one Dispatcher), let’s quickly review Arachni’s modules and plugins. Each
has a tab in Arachni’s primary UI view. The 45 modules are divided into Audit (22) and
Recon (23) options where the audit modules actively test the web application
via inputs such as parameters, forms, cookies and headers while the recon
modules passively test the web application, focusing on server configuration,
responses and specific directories and files. I particularly like the
additional SSN and credit card number disclosure modules as they are helpful for
OSINT, as well as the Backdoor module, which looks to determine if the web
application you’re assessing is already owned. Of note from the Audit options
is the Trainer module that probes all inputs of a given page in order to
uncover new input vectors and trains Arachni by analyzing the server responses.
Arachni modules are all enabled by default. Arachni plugins offer preconfigured
auto-logins (great when spidering), proxy settings, and notification options
along with some pending plugins supported in the CLI version but not yet ready
for the Web UI as of v.0.4.1.1
To start a scan, navigate to
the Start a scan tab and confirm
that a Dispatcher is running. You should see the likes of @localhost:7331 (host
and port) along with number of running scans, as well as RAM and CPU usage.
Then paste a URL into the URL form, and select Launch Scan as seen in Figure 1.
 |
| Figure 1: Launching an Arachni scan |
While the scan is running you
can monitor the Dispatcher status via the Dispatchers tab as seen in Figure 2.
 |
| Figure 2: Arachni Dispatcher status |
From the Dispatchers view you can choose to Attach
to the running Instance (there will be multiples if you’ve configured a high
performance grid) which will give a real-time view to the scan statistics,
percentage of completion for the running instance, scanner output, and results
for findings discovered as seen in Figure 3. Dispatchers provide Instances,
Instances perform the scans.
 |
| Figure 3: Arachni scan status |
Once the scan is complete, as
you might imagine, the completed results report will be available to you in the
Reports tab. As an example I
chose the HTML output but realize that you can also select JSON, text, YAML,
and XML as well as binary output such as Metareport, Marshal report, and even
Arachni Framework Reporting. Figure 4 represents the HTML-based results of a
scan against NOWASP Mutillidae.
 |
| Figure 4: HTML Arachni results |
The results are accurate too;
in my preliminary testing I found very few false positives. When Arachni isn’t
definitive about results, it even goes so far as to label the result “untrusted
(and may in fact be false positives) because at the time they were identified
the server was exhibiting some kind of anomalous behavior or there was 3rd part
interference (like network latency for example).” Nice, I love truth and
transparency in my test results.
I am really excited to see
Arachni work at scale. I intend to test it very broadly on large applications
using a high performance grid. This is definitely one project I’ll keep
squarely on my radar screen as it matures through its 0.4.2 and 0.5 releases.
In Conclusion
Join us again next month as we resume this discussion
when take Arachni results and leverage them for Realtime Virtual Patching with
ModSecurity for IIS. By then I will have tested Arachni’s clustering
capabilities as well so we should have some real benefit to look forward to
next month. Please feel free to seek support via the
support portal, file a bug report via the issue tracker, or to
reach out to Tasos via Twitter or email as he looks forward to feedback and
feature requests.
Ping me via email if you have questions (russ at
holisticinfosec dot org).
Cheers…until next month.
Acknowledgements
Tasos "Zapotek"
Laskos, Arachni project lead
Subscribe to:
Posts (Atom)
-
toolsmith and HolisticInfoSec have moved. I've decided to consolidate all content on one platform, namely an R markdown blogdown sit...
-
 When, in October and November 's toolsmith posts, I redefined DFIR under the premise of D eeper F unctionality for I nvestigators in R ...
 -
 You can have data without information, but you cannot have information without data. ~Daniel Keys Moran Here we resume our discussion of ...